Pinterest

FB Pixel

Pin it!

26.9.23

Interactive Slides Backgrounds


Welcome to the 21st Century K podcast. I'm Hannah at Teach Elementary School and I help other teachers bridge the gap between traditional elementary and 21st century expectations. We're continuing with our series of episodes on tips and tricks for using interactive slides in your classroom, and today we're going to talk about creating background images that make everything else so much easier. Thanks for joining. Welcome back to our series on tips and tricks for using interactive slides in the classroom. The last couple of weeks we've talked about how to share slides Once you get them finished. We've talked about how to link text and images and embed videos in your slides for student use and family use and for your own planning, and this week we're going to get a little more into the nitty-gritty by talking about creating backgrounds for your interactive slides. 

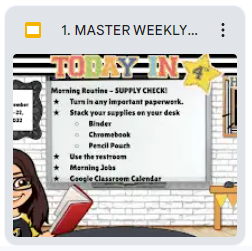
When you think about creating an interactive slide, you probably have lots of ideas in your head or you've seen lots of other people's creations that are so cool. But when you open that Google Slides app and you're staring at a blank white rectangle, it might be overwhelming to know where to begin. So I always start with the background. Like what do I want the background to look like? Do I want it to look like a classroom. Do I want it to look just like organized and cohesive, or do I want it to have a certain aesthetic, with my color scheme or something that goes with the theme that we're learning? What is my intent with the slide deck? That's what I think about when I start to create a background for a new slide. How much text am I going to have? Where are my images going to go? And then what am I going to use this for? A template or a background that you would create for your lesson planning is obviously going to look a whole lot different than something you would create for a student instructional lesson and then also a daily focus slide that you're going to present. So you kind of have to know your purpose before you start building your background. But once you know that, it's time to think about what will go behind the scenes of your slides. And the reason this is important is because you need to make sure that, first of all, any clip art that you're using, that you have purchased, is locked away and hidden away in the background, so that if someone else were to use your clip art or use your slide deck, they couldn't lift the clip art, meaning if you just pile up a bunch of pictures on a slide and share it with someone. They can copy and paste or right click and save any of the things that you've put on that slide, unless you have them secure in the background. 

So I start by choosing a background color or finding a background picture that I want to use as the whole background of my slide, kind of like my, my slate, or if you're thinking about it in terms of like a bulletin board, the paper that goes on the background. So I pick something for that and then I begin to build in the things that I want my students and myself to be able to see but not manipulate. So if it's a Bitmoji classroom that I'm going to use for my daily slide deck, I might add in some images of bookshelves or a computer or a smart board screen or even an inspirational poster or a flag or a school logo. I can add just about anything that I want, as long as I realize what I'm adding will not be part of the manipulation. I can't exactly link any of the things in the background and my students will not be able to tamper with or move any of these things when I'm making a background slide for a lesson plan template. I might create white boxes for where I want things to go so that I can organize my thoughts or what I'm typing. I might add in my name or the subject titles for each column that I'm creating things that aren't going to change over the course of the year. I'll definitely add some kind of cute inspirational clip art and I'll choose a background color, maybe for the whole year or maybe just for each month that will go behind all of those boxes and all of those words that I'm adding on top. 

Now the tip here is to create backgrounds that you can add to another slide deck where you're going to put all the things that need to be manipulated on top, and the trick is saving those slides to insert them in your new slide deck as a background. So there's a couple of ways to do this. I love, love, love PowerPoint, so I create all of my backgrounds offline using PowerPoint on my laptop, because I'm still old school and that's what I love. You could do the same thing in Google Slides, but I prefer PowerPoint. 

If you create them offline in PowerPoint, there's a way to go in and save your slide, your PowerPoint slide, as a JPEG or a PNG image file. So you go to file save and then choose the drop down menu Instead of saving it as a PowerPoint. Go down and choose JPEG. It will ask you if you want to just save the slide you're working on or the entire slide deck. It will create a folder and it will save each of those slides as an image. Once you do that, then you can go on over to Google Slides, open up a slide deck right click or two finger click or insert background whatever your method for getting there is and upload the image from your computer and it will pop it right in the background. So then all of those things are secure. You can be sure that nobody's going to lift the clip art, nobody's going to move anything around or change anything if they get a hold of your slide deck and it is absolutely stuck there in the background. Nothing you do on top is going to change how the background looks. 

Now, google Slides, I think, can be saved this way, but it's a little trickier. So I bypass all of that, and when I create a background on a Google slide deck that I want to save as an image, I just either screenshot and crop down the entire computer screen or I use the snip tool and just snip that screen and save it as its own image, and then I upload it into a new slide deck, the same way I would a JPEG or a PNG that I saved from PowerPoint. Once you do that, then you start adding all those links, all that text, all those images, maybe even something that you might change weekly, like your little bitmoji or the images of covers of books that you're going to link. You can put those right on your little shelf that's in the background. It not only makes it easier to use and less likely that anyone can make changes, but it also makes your slide decks load a lot faster. So the trick is that once all of that heavy graphic is in the background, you don't have to wait for each individual thing to load when you open your slide deck. If you've ever used a slide deck from someone who hasn't secured their background, you'll know that when you pop that slide open, it sometimes takes a while for every little image and every little piece to pop up. And when you get carried away layering stuff like I do, who knows how many things might be in the background. 

This week's tip is create your own personalized backgrounds, save them as images and then pop them into the background of your slide deck so that you can add all the interactive parts and pieces, all the linkable texts and images on top, so that you've secured your clip art, nobody's going to make changes and your slides will load a whole lot faster. Hope this helps. Thanks for listening. Still feeling stuck on creating your own backgrounds? I get it. That white rectangle can be really overwhelming when you sit down to create something new from scratch. That's why I've created a new resource with over 100 pre-designed, coordinated background images that you can copy and paste right into your own slide decks and then add on top to your heart's content. You can find this resource by clicking the link in the show notes. Maybe you're ready to make your own, but you need a little more guidance. I've got you covered too. CLICK HERE to learn more about 21st Century K's Interactive Slides Masterclass!


22.9.23

Sharing Interactive Slides


Welcome to the 21st Century K podcast. I'm Hannah, I teach elementary school and I help other teachers bridge the gap between traditional elementary and 21st century expectations. In this episode, we're going to kick off a series of episodes with tips and tricks on how to best use interactive slides in your classroom. Hopefully, these will be things you can take back and put into practice immediately, starting with today's tip on how to share slide decks with co-teachers and families. Thanks for joining. In last week's episode, I talked all about how I use daily focus sides to keep my lessons organized and to share with co-workers, administrators and families. So for the first trick and tip to using interactive slides in your classroom, I want to talk about how I share slide decks that I've created with others, and there's actually several different options for sharing that you may or may not have known about or maybe forgot, and this will be a great reminder. The first way to share a slide deck or any other Google file is to click the share button within the file and send it to people within your organization by adding their email address. So when you do this, you have two options. There's a little drop down menu beside each email address and you can select viewer or editor. When you select editor, that gives the person who follows your link rights to make any changes within your document. So if you're sharing daily focus slides with a paraprofessional or a special education co-teacher who needs to go in and make changes, then that is the perfect link to give them. It's a perfect way to share. If you are going to collaborate on creating and editing the slides, you might also do that with another teammate who's teaching the same content or what have you. These people also may benefit from a copy link and you can choose that on the share menu as well, so that it forces them to make their own copy of your file. So this would take away the opportunity to collaborate within the same document, but it would give them their own so that if they personalize it or make changes to use in their classroom, they can do so freely without making changes to your original. Now, when you click the share button, you can also choose viewer from the drop down menu after you add the email addresses of people within your organization. 

The viewer link is great for administrators or other teachers who are just going to be looking at what you have or showing it to students reading it for their own knowledge or just checking in on whatever it is that you're teaching. This is the link that I use for substitute teachers. It's been really great for me to be able to leave that link or link it in a digital lesson plan that I share so that my substitute can pull up my daily focus slide and have it on the board when students come in. This really helps the subs lesson stay on track and it mimics what we would be doing if I was there. So it takes out a lot of those questions from the students like what are we going to be doing, or we should have been doing this, or Ms Stark says that we do it. This way, you can actively communicate through that daily focus slide and it really helps a subs day on track and it gives your students some comfort and stability that the day is going to go, maybe hopefully semi normal. So those are the share options within the Google slide document. 

Now I don't use either one of those share links with my families, and that's where today's tip and trick really comes into play. In my daily emails I include a link to my weekly focus slide deck. I have found that many families enjoy just reading up on what it is that we're learning. Some families may even be so inclined to click some of the resource links or help their child with some of the content, ask them about it, have a conversation about how they're doing, or access the resources when their child is absent from school, so that they don't get too far behind. It is just a really great and easy way to share with families every single week exactly what you're doing and using in the classroom, and I am all about transparency when it comes to teaching and when it comes to working with families and everybody getting on the same page and being on the same team for my students. 

I found while I was teaching kindergarten online that sharing that link from within the document was a little bit cumbersome for families. Even when I send the viewer link, when they open the slide deck, it still looks like it's in the Google Slides interface. So all the toolbars are still there, even if they are not available for use. All of the thumbnails are down the left side of the screen and sometimes the print is really tiny because there's all that dead space around where you've created your slides and it can just be ugly, for lack of a better word, and if something is not easy to use or pleasant to the eye, most people won't use it. 

So I started thinking about how I might be able to share my slide decks in a way that it looks more like a website, and that's when I started sending my daily slide deck link as a present mode slide deck. So you may or may not know that when you open your slide deck in the address bar it's this really long Google address for accessing your slide deck or your file. If you go all the way to the end and delete the text after the last slash you'll say it usually says like edit with some numbers and some coding. If you will delete all of that away and replace it with the word present P-R-E-S-E-N-T, and then highlight and copy that entire address from the address bar and use that as the link that you send to families, when they click it it will automatically open your slideshow in present mode and you can't get out of present mode from there. So what that does is it gives families the slide deck with none of the extra stuff around the edge. There are no toolbar showing, there are no thumbnails down the side, there's no dead space around the slides themselves. It just pops up the slide and everything that you've hyperlinked is accessible and they can click through if you have multiple slides and find what they need. They can also access embedded videos within the slide or even embedded sound bites, if you ever use any of those. It is pretty cool. 

If I do say so myself, when families click on this link it pulls it up and it looks kind of like a webpage. Now, if you're using interactive slides with movable parts that you want students to manipulate and change, this is not the best link to send, because obviously, in slideshow mode you cannot manipulate any of the pieces. You have to be in edit mode for that, unless you have a new extension that I can't wait to share about in the next couple of weeks that allows you to move things in slideshow mode. It's game changing. Anyway, I digress when it comes to sharing the present mode link with families. It just makes it so much easier. 

Now, if you want to take this trip, tip, tip and trick to the next level, then you could screenshot your slide and put a little image in your email and hyperlink the image with your present mode link so that when families open their email, there's the image. I think people are far more inclined to click an image than they are to click text. So when the image is there and you hyperlink the image and they click on it, it will pull up your slide show in present mode where they can access the resources and click through if they need to. If you are feeling like you can really take this to the next level, then you are gonna love this trick. This is the magical part to me. It's what makes my job easier. 

So what I have done is created one slide deck that I have named my Master Weekly Slide Deck and I have it saved in a folder on my computer In my Google Drive. For that particular slide deck, I got the present mode link. By going to the end, deleting the last part and replacing it with the word present, I copy that present mode link and created a shortcut bitly URL. So if you take that entire address, go to bitlycom and put your entire present mode address for your Master Slide Deck and on the Bitly site it creates a shortcut link. So I have a shortcut link that's bitly forward slash, stark, daily slides 2023,. Let's say, I create that shortcut link and then that's the link that I use for my emails and for any other place that I'm sharing my daily slides in present mode with my families, and this is where I save so much time and energy. 


I have a folder with a slide deck for each week of the school year. Every week I pull that slide deck up and make adjustments for the new year and then I copy and paste those slides into my Master Weekly Slide Deck. That means that when anyone clicks to access that Master Weekly Slide Deck, it will automatically have the updated slides for the current week. Oh, this means I do not have to remember to go back and link every individual weekly slide deck in my emails. I just use the same link every single time. It is the same link that I can leave for a sub if they just need to access it in present mode. It's the same link that I can send on a whim to a family if a student is maybe sick or absent for a long period of time. And it's the link that I put in my emails every single day. So I do not have to remember to change out my links, because every single week I just change out the slides. I have that same slide deck bookmarked at the top of my Chrome homepage so that when I get to school I click daily slides and up pops whatever I need for the week, right there before my eyes. I use the same shortcut link for families and they're able to click and access my daily slides at any given time. It has been a total game changer and it's been totally helpful for many of my families. I hope that it helps you too. 

So let's recap. The first tip and trick that we have learned for using Interactive Slides in the classroom is to share them. You can use the share links and the copy links within the Google Slides program to share with coworkers, co-teachers, teammates, administrators, substitute teachers and anyone else who may be helping in your classroom. But you can use that special present mode link to send to families so that they can click and access your slide decks from their phone, from their tablets, from work or from their home computer. Simply go to the end of the address bar and delete all of the text after the last slash and replace them with the word present P-R-E-S-E-N-T. Then grab that entire address and use that for your families. Or, if you're really feeling fancy, grab that entire address for your master slide deck, create a shortcut link and send the same shortcut link to your families, day after day, week after week, while you just change out the slides in the background to prep for each new week of school. I hope this helps and that you are ready to tackle your daily focus slides this week. 

Hey, have you ever thought about making your own interactive slide decks? Maybe the thought has you feeling overwhelmed because you don't understand the technology, or there are just so many options you don't even know where to begin. Well, don't worry, I've got you. I am working on an interactive slides masterclass, a one-time course you can take at your own pace to learn all the tips and tricks I know for creating interactive slide decks that you and your students will love. We'll talk about how to create interactive slides like my calendars and literacy reviews, and also daily focus slides that you can use in your classroom every day of the school year. We'll even talk about how you can come up with your own ideas to create slides that you can sell yourself. I mean, if we're going to do all this work for our own classrooms, why not help other teachers and make a little passive income on the side, right? CLICK HERE to learn more about 21st Century K's Interactive Slides Masterclass!

6.9.23

Daily Focus Slides in 21st Century Elementary

I still say PowerPoint is superior and there are many things PowerPoint can do that Google slides cannot just yet, but Google slides is a pretty close second. I started creating daily slides that I used with my online lessons, both to share over Zoom and also to send to families so that they could access the teaching content as well on their own time as they worked through assignments. The first slide in the slide deck would have all the expectations for the day, the things that they needed to have ready for our live lesson. It would have the cover of the book we were going to read and, of course, my cute Bitmoji, who was prepared for whatever content or season or holiday was around the corner, and I would post this at the beginning of each of my live lessons and from there I had other slides that I would go to that were made to look like classrooms for each subject area and that would sort of signify in a visual way that we were switching to new content, and also was a place for me to show things like anchor charts and vocabulary word definitions, as well as pictures of the worksheets that they needed to pull from their folder in order to work with me when I was live online. In addition, I could put pictures of completed worksheets so that when parents went back to that slide deck later, they would see what the answers to the questions were in order to better help their children. 

It was really a pretty cool thing, if I do say so myself, and when I went back to teaching kindergarten in person, I continued to use my slide deck resources. I mean, I had spent a lot of time on those and I had also done tons of research and found all kinds of slides that were made into libraries about different thematic contents or author libraries or activities or science videos. In fact, there are still more, or there are still bitmoji classroom groups on Facebook that are active today. If you join them, lots of people share free resources they've created. You just click it, copy it to your Google Drive and then you can access the slides to add them to your own slide decks and many of them are made to where you can edit them and use them as you see fit. 


So because I had created this vast collection of slides, I thought well, why can't I use this to help me in the in-person classroom? I posted my daily or weekly once I was in person morning slide that had the letter we were studying the book we were reading, the lunch choice for the day and all kinds of other things listed along with my cute bitmoji, and this would be posted when the students would come in the classroom each morning. Behind that, I would have linked up a slide for each subject area and also slides with those cool libraries and videos that I talked about before. Then I could project this and talk a little between the slides and access any of the content that I needed at any given time during the school day. It became really, really useful in the classroom. 

So when I moved to fourth grade, I continued. I definitely still have my first slide and I still use my bitmoji, even though it's kind of cheesy, and I have a slide for each day of the week, but it looks a little different For the big kids. I have listed the activities that we're going to do for the day. I have my ICANN statements and my guided questions, guiding questions, guided guided questions. Easy for me to say Sorry, my guiding questions posted, but I also link up whatever texts we're going to be reading. I have a 10 minute timer that comes in really handy for journal entries and other things like that. On my morning slide for my homeroom I link to our school news and so I can get that with a click and show it to my students and include the lunch choices and just all that good stuff. It really makes the transition to reading class easy because it's popped up on the board and there's no guessing what will happen in class that day. Students can come in, look at it and know what the expectation is going to be. But organizing my day is not where these daily focus slides end. 

I really, really liked when my online families back during the pandemic could access those slides and use them at home. So when I taught kindergarten in person after the pandemic, I would link my slide deck in my daily emails and it became really great for families to click and go in. They could review concepts and contents, they could watch video lessons, their students could click and read some of their digital guided reading books to their families and it was a great way for families to make connections with what we were learning in school. I continue to do the same thing in fourth grade, sharing my slide deck with families every week. It's wonderful for the older kids because if a student is absent or gone on a trip, they are able to access each daily plan and also access the text that we're reading, because I try to include a YouTube link for each book that I'm going to be reading, which is super handy when I don't have a copy of the book or I need to speak with someone, but the class needs to keep going forward or I lose my voice and don't feel well and feel like reading that day. 


It's nice to have all of those digital links right there handy for myself and for my students and their families, but I also share these slide decks with my collaborative teachers, with substitute teachers and with my administrator. There's no question what is going on in my classroom and I have one place for my co-teachers, collab teachers and anyone else who comes in the classroom to access and view and help students with what we're working on. It's really become an important part of my lesson planning. In fact, because I love Google slides so much, now I even do my lesson plans on Google slide and each week I link to that slide deck. It's so wonderful when we can create systems to help ourselves in the classroom that we can use over and over again, and that's why, after taking the time to create these slide decks last year, I'm reaping the benefits my second year and fourth grade when I go to that file, pull up the slide deck for the week, check the links, make a few tweaks, change the day and I am ready to go each Monday morning. The time saved is well worth the work that I put in on the front end creating them the first time. Aside from just keeping me on track while I'm teaching, my daily focused slides help my students stay focused on the lesson when know their expectations, and they help my families be able to connect to our education my co-teachers and collab teachers to access what we're doing each day, my administrators, if they want to keep tabs on my fourth grade classroom, and even my substitute, when they come in, has access to everything that we're doing that day. It has been a huge help in my classroom and if you don't use daily focused slides, I highly encourage you to start. Start with one, see how you like it, and I guarantee you'll be adding to them and saving them year after year, just like me. Thanks for listening. 

Hey, have you ever thought about making your own interactive slide decks? Maybe the thought has you feeling overwhelmed because you don't understand the technology, or there are just so many options you don't even know where to begin. Well, don't worry, I've got you. I am working on an interactive slides masterclass, a one-time course you can take at your own pace to learn all the tips and tricks I know for creating interactive slide decks that you and your students will love. We'll talk about how to create interactive slides like my calendars and literacy reviews, and also daily focus slides that you can use in your classroom every day of the school year. We'll even talk about how you can come up with your own ideas to create slides that you can sell yourself. I mean, if we're going to do all this work for our own classrooms, why not help other teachers and make a little passive income on the side, right? CLICK HERE to learn more about 21st Century K's Interactive Slides Masterclass!